Cheating Lying TVs
This is a guide towards coercing TV sets or other monitors into pixel-perfect graphics display even if they do not announce their native resolution for the connected graphics card to use. (If you came here looking for mainstream media criticism: Please move on).
Initial symptoms / problem statement
When connecting a "Silva-Schneider LDT 2220 DVD" TV set via HDMI to a Debian GNU/Linux system featuring a Radeon HD 7340 card, it offers several well-known resolutions (eg. 1080i, 720p, 720x480) advertised via EDID, but they are either flickerish (1080i) or look blurry (720p). The blur might be only visible clearly when the TV's video sharpening is disabled, but even with sharpening, the mouse cursor's edges don't seem to snap into the pixels -- a typical sign of a monitor with a non-fitting resolution.
The typical underscan related measures don't have the desired effect, leading to the conclusion that the display's native resolution is none of the announced. (I suspect that by the time the device was built, the manufacturer got their hands on odd sized panels because they were cheap, and the typical consumer who only connects gaming consoles and plays DVDs can't tell the difference anyway as long as all devices involved agree that we're watching HD TV).
Step 0: Setup
This tutorial will assume that you have a Linux device connected to the TV via HDMI, which has a second reliable monitor (typically a laptop's internal screen) running X11 (if you don't know about it but are running Linux, you probably are). Relevant tools are a command prompt, an image viewer (I'll be using geeqie), and a web browser and a calculator. Basic knowledge of how to set up a second monitor in your environment is assumed (after all, otherwise you wouldn't have ended up here); set it to any resolution that looks like a good staring point.
If you do not have a second monitor at hand (eg. because you are using an embedded system to drive your display), you might want to do the display configuration using a remote command prompt (ssh). In that case, don't forget to set your remote shell to work on your main display by running
export DISPLAY=:0
to avoid error messages like "Can't open display".
The reference image I'm using is a hacked-together custom one whose components will be discussed in relevant steps. It is 2000x2000 pixels large, which should be large enough to cover current offending TVs (I expect the upcoming 4k displays to behave; the test image should be usable on larger displays too anyway). A preview is shown below. Download it, open it with your preferred image viewer, move it to the TV monitor and set the zoom to 100% (1:1). Now is also a good time to go over the TV's settings again: All kinds of image optimizations (most commonly sharpening) should be set to zero; they'd only distort the results.

Step 1: Rough approximation
Next to the image center, you will find two bars of 8 and 16 pixels width. Look at the 8px one very closely and count width of the bar in pixels as you see it on screen. The left and right pixels are likely to be gray; you can count them as half, it doesn't matter too much in this phase.
If you have trouble making out the individual pixels, you can try the green version of the reference image, it may make counting easier. A camera with a macro lens and good manual brightness overrides (I had to go to -2.0EV to clearly see the pixels) can be helpful too.
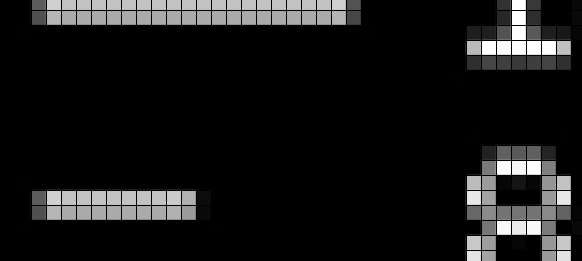
In the example above, we'd count 10 or 10.5 pixels where there should be 8. This means that our resolution should be increased by 10.5/8; if you started with 1280x720, let's go to 1280 * 10.5 / 8 = 1680 x 720 next. (We'll play around horizontally first, and will take vertical into consideration in step 3.)
Setting an odd resolution
The resolution should not be in the list of available resolutions, so we'll have to add one manually. This requires some calculation that is most easily done with an online tool like the XFree86 modeline generator. You may skip most fields; enter the visible resolution (in our case 1680 / 720), a refresh rate (stick with moderate 50Hz for now, you can go lower if your monitor starts refusing modes), and calculate a modeline.
The resulting modeline (Modeline "1680x720@50" 77.10 1680 1712 2000 2032 720 735 741 757) is suitable for inclusion in a xorg.conf file; as we'll change the mode on the fly using the xrandr tool, we'll need only the numeric parts (from 77.10 to 757).
In the next steps, we introduce a new mode line to the X server, assign it to the HDMI output (called HDMI-0 in the examples, modify that if the output of xrandr indicates that it is named differently), and activate it by entering the following lines into your terminal:
xrandr --newmode testing 77.10 1680 1712 2000 2032 720 735 741 757
xrandr --addmode HDMI-0 testing
xrandr --output HDMI-0 --mode testing
Your display should now change its resolution. Make sure that the image viewer is still zoomed to 100%. Now the "8px" bar should really be roughly 8 pixels wide. (As this is a rough first step, it's not too bad if it's 8-and-two-grays, it just shouldn't be wider than 10).
Step 2: Interference
Look at the horizontal "gray" stripes now. They are actually a pattern of single black and white (or green) rows. As we are now in the ±10% range of precision, those lines are likely to form interference patterns of areas with sharp pixels and areas where all pixels are more blurred / gray like below:
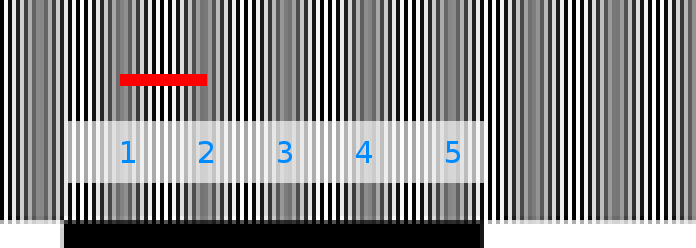
Count the number of pixels from one most-sharp pixel to the next (like the red line in the image), here it is 19. (Don't forget to count black pixels too). If they are too small, you can take the big black and white bars next to the fine lines for orientation: Each black or white block is 100px wide. In the image above, there are 5 gray blurs (blue numbers) over a distance of 100px, making the distance 100px / 5 = 20px. In this step, being precise helps you to get better results faster, so if you can, count the number of grays over several blocks and divide then appropriately (eg. for two blacks and two whites: 22 grays in 400px = 18.2).
This means that we are off by a factor of (18.2 + 0.5) / (18.2 - 0.5) or its inverse (18.2 - 0.5) / (18.2 + 0.5), which gives a horizontal of 1774 or 1590, and there is no real telling which one it is. (You might guess from the apparrent width of the 8px or 16px wide strips, but given that both the left and the right pixels might be blurry right now, that won't necessarily be usable).
(Some background: what we're using here is a form of interference between the spacial frequency of the pixels as the TV understands them, and the pixels as the PC understands them. Measuring their differences directly would become increasingly tedious as we approach <1% in error, as we'd have to judge whether the pixel next to a fully lit one has a brightness of 1% or 2%, but with the tool of interference, we can transfer the measurements into macroscopic scale.)
Setting yet another resolution
Let's try 1774 first. The mode line calculator gives 79.93 1744 1776 2072 2104 720 735 741 757 for this.
As there is already an assigned mode testing, I found it practical to pack the removal of the current mode and its replacement on a single line and only edit the number block on each successive iteration:
xrandr --output HDMI-0 --off; xrandr --delmode HDMI-0 testing; xrandr --rmmode testing; xrandr --newmode testing 79.93 1744 1776 2072 2104 720 735 741 757; xrandr --addmode HDMI-0 testing; xrandr --output HDMI-0 --mode testing``
As before, you'll need to change the HDMI-0 name if your output bears a different name. To keep working areas intact, I like to added a --right-of LVDS clause to the last command, which that places the TV next to and not over your working monitor. The name LVDS might need changing to whatever your monitor output is called.
Rinse and repeat
If the distance between gray areas has increased, or there is even only one gray and one sharp area from left to right, you are closer to pixel perfection. If there is now more disturbance in the patterns, you've picked the wrong direction; reversing the plus and minus signs in the calculation of the new width and and try again.
The general idea is to stretch the distance between those gray areas to infinity, and then hope that the monitor is clever enough to place our image into one of the sharp areas and not into blurry-land.
This step can be repeated two or three times depending on how good your readings are; finally you should arrive at a stage where there is only one sharp area or one gray area or maybe one of each at the opposite ends of the screen. Then, it's time to proceed to the next step.
Step 3: Adjustment of the vertical axis
While you could go through the same steps 1 and 2 with the vertical alignment as well, you should have the aspect ratio of your display to help scaling the vertical axis.
For a typical TV that advertises a resolution of 1280x720, if your determined horizontal resolution after step 2 is 1720px, try setting the vertical resolution to 1720 * 720 / 1280 = 968. That should give you a result of similar to the end of step 2.
On the device I've been trying this on, setting the vertical resolution into a realistic area set me back on the horizontal pattern -- why, I don't know, but if it happens to you, go back to that step and work your way to its end again with the more realistic vertical resolution.
Step 4: Fine tuning
By now, the horizontal and vertical resolutions should be within 2px of the device resolution.
For the last steps you'll need to try increasing or decreasing the resolutions pixel by pixel. If you start seeing more gray areas than before, you're moving in the wrong direction. Unless you hit a strange jump as described in step 3, you should be able to fiddle your way to pixel perfection horizontally and then try the vertical axis.
For this step, you can fiddle with the pixel counts directly in the mode line without going through the modeline calculator, which might refuse to give you very odd pixel numbers. Just take the last output you received from the generator, find the numbers that indicates the horizontal and vertical pixel counts, and increase or decrease them number by number. You can't do that to excess, for the mode line might become invalid if you jump more than a few percent outside the calculated line, but in this phase, you shouldn't need to go that far.
In the end, there should be one resolution in which the test image shows clear white or green lines with no gray areas inbetween, neither for horizontal or vertical stripes.
Missing Step 5: Remaining overscan
After having achieved pixel-perfect alignment, there might still be overscan in play too. I couldn't correct that with the graphics card's provided underscanning or a modeline calculator that allows overscan compensation. If full screen applications cause trouble with the missing pixels (in my case: 15px on the left, 19px on the right and 8px each top and bottom -- it is a 1680x1050 panel, after all), using the xrandr 1.5 feature of explicit monitor areas should allow fixing the last bits.
When I've worked out how to best do this, I'll add an update here.
Finalization: Permanence
The mode line determined at the end of step 4 will only stay active as long as the X server is running -- after the next reboot / login, it will be gone.
Back when X11 was not autoconfigured all the time, there used to be a file called /etc/X11/xorg.cof in which the mode line could be entered in the form in which it is displayed in the modeline calculator. If you do have one, add a line like
Modeline "native" 79.93 1744 1776 2072 2104 720 735 741 757
into that file. Otherwise, create the directory /etc/X11/xorg.conf.d and a text file hdmi.conf inside it that says:
Section "Monitor"
    Identifier     "HDMI-0"
    Option         "PreferredMode" "native"
    Modeline       "native" 79.93 1744 1776 2072 2104 720 735 741 757
EndSection
With that file saved, the right resolution should be picked after boot.
About this tutorial
© chrysn <chrysn@fsfe.org> 2016, published under the terms of CC-BY-SA.
The original URI for this document is http://christian.amsuess.com/tutorials/cheating-lying-tvs/. It is available as HTML or as reStructuredText.